|
Douglas Instruments
Version 1.1
Optimization - using
microbatch
Step by Step Instructions for Beginners
Hardware Preparation
Use a ground glass syringe or pipette to dispense 6 ml
of light paraffin oil into a Nunc HLA plate. Tip the plate and remove 4.5 ml of excess
paraffin, leaving paraffin in the wells.
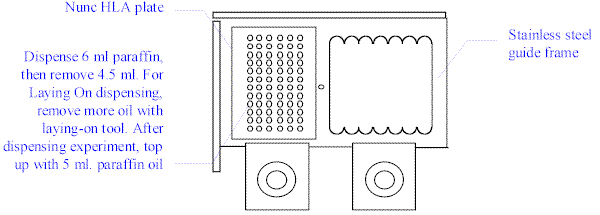
Place the Nunc HLA plate in the left side of the
stainless steel frame on the Plate Loader as shown below.

Connect a 5-channel Microtip to the 5 channels
of IMPAX. Place the tip in the 5-channel "collet" on the Z-arm of the Plate
Loader. Place a small glass vial under the tip to collect waste.
Fill the ground glass syringes of the upper valves
with degassed pure water and replace them.

Creating an Experiment File
Switch on the computer, and wait until XTGOLD is
loaded. Move to the directory where you want to keep your optimization files (e.g.
C:\EXPTS\X-FILES) and press F9. Select "XSTEP - Optimization" from
the menu. (Alternatively you can enter XSTEP at the DOS prompt.)
The Main Menu of XSTEP will appear. If you want to
create a new file, select Files, then New File and provide a
name for the new file (8 letters or numbers, with no extension.)
Alternatively, to work with an existing file, select Files,
then Load a File. Type in the directory that you want (if it does not
appear) and press Enter. Move the cursor to the file that you want, press Enter
to select it, and then Enter to load it.
Finally, press Esc to return to the previous menu.
If you have created a new file, or if you want to
modify the names or concentrations of the stock solutions of an old file, press I
to select the Ingredients option. Press A (or S or D for a pH
experiment), then modify the concentrations and names of the ingredients displayed. Fill
in the viscosities of PEG solutions etc. As a guide, the viscosity of 40% PEG 8K is 40,
while the viscosity of water is 1. Finally, press Esc, Y (to keep the changes) and
Esc to return to the Main Menu.
The simplest type of dispensing is when the
"Laying On" option is disabled. Select Dispensing Parameters. If Laying
On is enabled, press L. Press Esc to return to the Main Menu. (If you do
use Laying On, you must use the Laying On tool to remove excess oil - see Laying On in the
Protein Crystallization manual.)
From the main menu, select Spreadsheet.
Each group of numbers shows the concentrations of the 5 ingredients in a well. Move to a
well and press Enter to edit its values. To interpolate values between the two most
recently edited wells select Interpolate. To optimize around a point, select
Expand. See "Spreadsheet" in the manual for other options. When
the experiment is ready, select Save to save it to disk. Finally press
Esc to return to the Main Menu
Liquid Handling Calibration
Move the cursor up to the flashing option entitled
"CALIBRATION NECESSARY", and press Enter. Turn the valves to the
positions shown, and press R.
The positions of the motorized syringes are now shown.
If you suspect that any motor positions are not correct, press Z, then S to
rezero the syringes, and P to rezero the Plate Loader. Finally press Esc.
At the beginning of each day the system will require
debubbling. Place a small bottle or vial under the Microtip in the Z-arm and press D.
Press Enter to start debubbling. After about five seconds press Enter again.
Any air bubbles that were present at the top of the motorized syringes should have passed
out into the connecting tubing.
Now remove the air bubbles from the connecting tubing
as follows:
- Remove the PTFE tubing from the needles of debubbled motorized syringes.
- Expel water and air bubbles from the tubing using the ground glass syringe.
- Reconnect the tubing carefully, ensuring no air bubbles re-enter.
When this is completed, press P.
If there are bubbles between the upper and lower valves, turn the top
valves to the flush position (|- ) and flush the
bubbles out through the microtip with the ground glass syringes. Then return the top
valves to the fill position ( l ).
A routine for preparing the motorized syringes appears. Motorized
syringes 2 - 5 should be moved to their lowest positions to be ready to dispense buffers,
etc. Motorized syringe 1 should be nearly empty so that it will be ready to suck up
protein solution. Press P again to move syringes to these positions. When the
syringes stop moving, press any key.
You should now manually flush the bores of the microtip with
solutions. The microtip acts as a reservoir of solution. Press Y, turn the valves
to the positions shown, and press R. Using disposable syringes, flush all bores
with water. Leave water in the channels 1 and 5. Flush the other channels with air, then
the appropriate ingredient. Press any key, again turn the valves to the positions shown,
and press R.
You should now have returned to the Main Menu. If you suspect that the
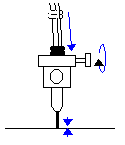
5-channel Microtip is not set to the correct height select Liquid Handling.
Press A to select Adjust/Change Microtip. The arm will move to its lowest
position. Follow the instructions on the screen: (1) adjust the height of the Microtip
until it is just touching the table. (2) Tighten the collet. (3) Mark the height by
moving the two o-rings down to the top of the collet. Press Esc to return to the
Main Menu.
Execution of the Experiment
From the main menu, select Spreadsheet. To execute the
experiment, press the Caps Lock key to obtain a new (red) menu. Ensure that there
is no droplet on the end of the Microtip. Then press L to load protein, and press
Enter four times to accept the default settings and load air. (The air separates the
protein to be loaded from the water in the Microtip.) Undo the thumbscrew securing the
Microtip, remove the Microtip from the Plate Loader, and place the tip into protein
solution, avoiding any precipitate. Press any key to load the protein. Replace the
Microtip in the Z-arm of the Plate Loader and tighten the thumbscrew.
Press X to execute the experiment automatically. This will
take about 5 minutes for 24 wells. On completion, press Y to save the file if you
have not already done so. If you have a printer attached to the computer, press Y
again to get a report print out. Release Caps Lock.
Add 5 ml paraffin
to the HLA plate (or 5 ml 50:50 silicone and paraffin mixture to allow slow evaporation).
Place the plate in an incubator at the desired temperature.
You must not turn off your computer without quitting XSTEP or the
motor positions will be lost. To quit XSTEP press Esc until you reach the main
menu. Press Esc again, then Q.
Note: The valve positions shown here indicate the desired
connections between the three valve ports. For the old-style valves with levers, the lever
should point to the blocked port. For example, the flush position ( |- ) corresponds to the lever pointing to the left ( ==o ) on an old-style valve.
|